Digital Self-Portrait Project
Description: Combine a photo of yourself with at least 3 additional images that tell us a little about you. To make it a true work of art, we'll be using blend modes and painting tools to create unity (make them all work together).
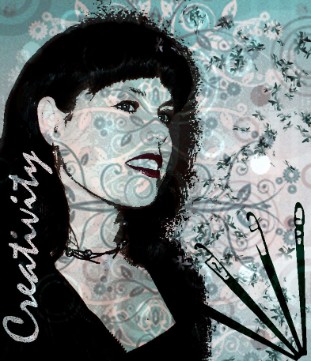
Example and Tutorial
STEP 1: Preparation
- You will need a picture of yourself. If you don't have a picture to use, you will need to bring one to class tomorrow, or take one from your computer.
- Find three other images online. Patterns and textures you like are good. You need to include at least one image that is recognizable as a symbol of something about you. For example, if you like music, it could be an image of music symbols. Keep it school-safe!


STEP 2: Use Threshold to create a black and white effect
- Open your photo in Photoshop. Save it in your group folder as lastnamefirstinitial-collage.psd.
- Click the Create New Adjustment Layer icon (the half-black, half-white circle) at the bottom of the Layers panel and choose Threshold.
- Move the slider left or right until you're happy with your image.

STEP 3: Combine the images
- Add the other images to your .psd file, each on its own layer. Make sure these layers are positioned above the Threshold layer in the layers panel.
- If any of your images are .gif files, you'll need to change them to RGB files before you can move them into your .psd file. Do this with Image > Mode > RGB Mode.
- Use Transform (Ctrl-T) to resize the new layers to fit your photo size. Remember to hold down the Shift key a drag from a corner to maintain the original proportions. Press Enter to complete the tranformation, or Esc to cancel it.
- Feel free to change the color of any of the images, or paint into them with the painting tools.
In my collage, I resized the two patterns to completely fill the image area. Then I changed the colors of the circle pattern (Image > Adjustments > Hue/Saturation), ran a filter on the flowery pattern (Filter > Artistic > Film Grain), and made the paint brushes look more graphic (Filter > Sketch > Stamp).


STEP 4: Change the Blend Modes
- Change the blend mode of each of the top three layers to Linear Burn.
Linear Burn will appear to drop out white and the lightest values from the layer to which it is applied. This blend mode produces the darkest colors of any mode in the Darken category, though with more contrast than the others. It has a tendency to make pixels solid black, which makes it ideal for grungy, textured collages.


STEP 5: Make adjustments
- Use the move tool to position the texture layers to your liking.
- Adjust the opacity of layers to make some stromger and others more subtle.
- Use painting tools to add black or white to your original image. This will allow more or less of the texture layers to appear.
- If you want to bring back a touch of the color of your original photo, you can reduce the opacity of the Threshold adjustment layer.
In mine, I double-click on the background layer and clicked OK so it is a regular layer I could move to the left. I used a large white splatter brush to paint out some of the black on the right edge of the photo.

Then I moved the brushes to a more visible location, and reduced the opacity of the blue pattern and Threshold adjustment layers to 50%.

STEP 6: Hide textures with Layer Masks
- Where you want to hide part of one of the texture layers, select the layer and then click the Add Layer Mask (the circle within the square) icon at the bottom of the Layers panel.
- Select the Brush tool and press D to set your foreground color to black.
- Make sure the layer mask thumbnail is still selected in the layer panel, then paint with black where you want to hide a portion of the texture (use a regular round brush and select how hard you want the edge first).
- If you painted too much, switch the foreground color back to white and brush back over that area.

Hint: If you only want to soften the opacity of the painted area rather than remove it entirely, paint with a middle gray instead of black.
In my image, I wanted to soften the brown pattern where it shows in my face. I painted with gray on the layer mask there.

STEP 7: Add Text
- Decide on a word or short phrase that will work with the artwork you created.
- Add the text in an appropraite font and size.
- Play with the techniques you learned here to give the text a special look.
Here I typed the word "Creativity" in white 130pt Casmira. Then I rotated it sideways (Ctrl-T, rotate at a corner).

The white was too strong. To show the textures through the text, I moved the text layer below the Treshold adjustment layer in the layer stack.

Then I rasterized the text (Layer > Rasterize > Type) and applied a reticulation filter (Filter > Sketch > Reticulation). I desaturated it to remove the red (Image > Adjustments > Desaturate).
STEP 8: Paint
- Create a new layer anywhere in the stack.
- Create a new custom brush and change its shape and scatter (this is the custom brush tutorial that you just completed).
- Select a foreground color and paint a few strokes. I experimented with a many different ones (Ctrl-Z to undo) before I painted one I liked.
- Change the blend mode of the custom brush layer. I used Difference below.
- Change the location of the custom brush layer in the layer stack, if you like.
- Save your lastnamefirstinitial-collage.psd file and turn it in.
I also made my paint brush image black (Image > Adjustments > Brightness/Contrast).
Here's my final image (click on it for a larger version):

Thanks to Photoshop User Magazine for this tutorial idea by Lisa Snider King, as well as thanks to the NHS Designs website for the helpful tutorial.